Disk Recon 14.1
Folder Sizes — Visual Disk Space Analysis
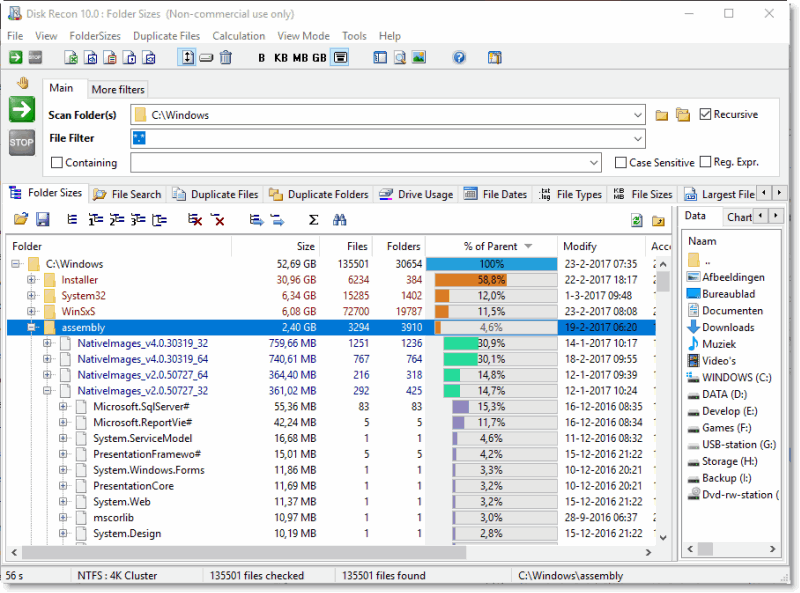
This tab allows you to see a tree structure of your folders where each node of the tree structure will show the total size and optionally the number of files in the corresponding folder on your disk.
How Disk Recon Scans Folder Sizes
Disk Recon will scan the folder(s) you selected and while doing so it will generate a tree structure that holds all the details about the number of files and the total size of all these files.
Understanding Your Disk Space Usage
This tree structure is very helpful to get a quick overview of how your diskspace is used and to find the programs or folders that are eating up that diskspace. My personal experience is that this is very helpful for determining where, when and how to clean up my harddisk.
Toolbar Buttons and Controls
Above the folder tree there are several buttons.

These 2 buttons allow you to load or save the results of a scan.

These buttons let you control the depth to which the folder is expanded. These buttons affect the whole folder tree. Disk Recon calculates data for all folders it finds, but often it is only necessary to get a high level overview and then you can select a depth level by pressing these buttons.

With these 2 buttons you can clear the whole list, or remove the selected item from the list. When an item is deleted this way, all the subfolders will be removed from the list as well.
CAUTION : These actions will only affect the view. No files or folders are removed by this action.

These buttons allow you to copy the whole tree or a specific folder to the list (Folder Sizes 2 tab) on the right side. More about this is mentioned below.

You also have the possibility to search for a specific foldername (or part of a foldername).

The left button of these two lets you refresh a folder. Suppose you scanned a folder recursively and decided to delete one or more folders in it. Disk Recon will not automatically detect these changes, but by pressing this green button it will rescan the selected folder and update the data in the tree structure.
The right button is associated with the file list to the right of the sizetree. It allows you to go one level up.
The menubar also allows you to optionally switch off the colors of the folder tree.
Detail display
Next to the folder tree you can find a detailed display, which has three tabs ("Data", "Chart" and "Folder Sizes 2")
The data tab shows the file list, which is directly linked so that you can always see which files
are in the selected folder. In the menu bar you can optionally disable the link between the folder
tree and the file list. When you want to browse through the folders it can be time consuming to refresh
the file list every time, but you can eliminate this delay by temporarily disabling this link.
By right clicking on the file list or the folder tree you can pull up context sensitive menus, which
allow you to perform standard actions on the selected items.
The chart tab gives you a graphical overview of the data in the folder tree.
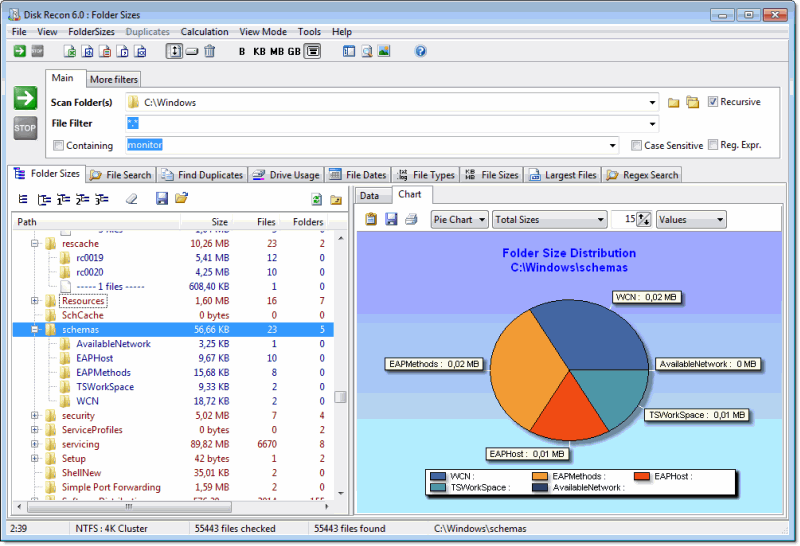
On top of this chart you can find several controls to change the display options of this chart.

The first button allows you to copy the graph to the clipboard. The second button lets you save the image to an image file and the third one sends it to the printer.
Next you can choose a chart type:
- Pie chart
- Bar Chart
There are several types of information that you can display:
- Total Sizes
- Total Allocated Sizes
- Total Wasted Sizes
- Number of files
You can also set the maximum number of items that you want to display on the graph. The items displayed will always be the top n items from the list. This can help in making the graph easier to interpret.
The last option allows you to choose how the values are displayed:
- Values
- Percentages
The Folder Sizes 2 tab has the same possibilities as the "Folder Sizes" view on the left side. It allows you to compare different folder structures side by side.
Above this tree you can find the same buttons as on the left side, added with two buttons that allow you to copy the whole tree or a specific folder from the left side.