Disk Recon 14.1
Control Panel
What Disk Recon really does is to run customized queries on the contents of your disk(s) and display the results.
The first thing you need to do is tell Disk Recon which files or folders you want to work with. The control allows you to provide this information.
The control panel is also the place where you define which parameters are used for your queries. These parameters (usually called filters) are divided into different tabs.
The Main tab
This one contains the most commonly used parameters.

As you can see in the picture above, this is where you select in which folder you want to start scanning. The dropdown menu lets you select the root folders of all your drives, but you can also type in any folder name you like (full path). Pathnames in UNC format are also supported.
You can enter multiple start folders, divided by a semicolon. The 'multiple folder' button opens a dialog that makes selecting multiple folders easier.
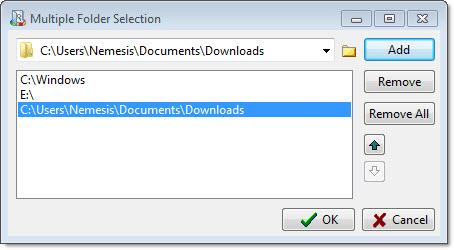
When multiple folders are specified, Disk Recon scans all of them in sequence and combines the results into a single result set — exactly as if each folder had been scanned separately and merged. All filters (file type, date, size, content) apply equally across every folder in the list.
The file filter lets you decide which files you want to include in your queries.
There are several predefined file type sets in the dropdown menu, but you can also
type in your own filter set. You can use wildcards in the filter name, and also use
different filters separated by a semicolon (example: *.doc;*.xls).
The last item of the main control tab is the option to include only files that contain a certain word or phrase. This option is activated by checking the 'containing' box and typing in the word or phrase that you want to be included. Case sensitivity in this search is also possible by checking the appropriate checkbox.
The 'More Filters' tab

This panel lets you place a filter on all the basic file characteristics.
- File Date : (Modified, Accessed or Created date)
- File Size : (smaller, equal, larger or between 2 sizes)
- File Properties : Check the properties that you want the returned files to have.
By default these filters are disabled because they are usually only used in special cases. In order to activate one of these three filters you need to check the checkbox in front of it.
The 'File Search Options' tab

This tab is only available in 'File Finder' mode. You can choose not to include files or folders from your query by unmarking the checkboxes. By default they're both checked.
Furthermore you can choose to run a query within the results of a previous query, or to add the results of a new query to the results of your previous query:
- Search within previous results — the new scan only considers files already in the current result set. Use this to progressively narrow down results (e.g. first find all
*.logfiles, then search within those for files containing a specific string). - Add to previous results — results from the new scan are merged with the existing results. Use this to build a combined list across multiple criteria (e.g. collect all
*.tmpfiles, then add all*.bakfiles to the same list).
The 'File Duplicate Options' tab
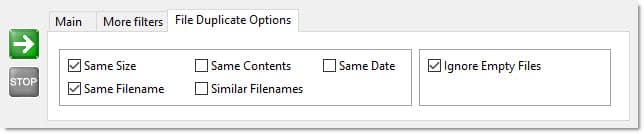
This tab is only available in 'Find Duplicates' mode. The first panel within this tab lets you define what 'Duplicate' means. There are four options which can be combined (Contents, Name, Size, Date). Content checking is the best way to find out if two files are really identical, but it also takes a lot longer because the CRC needs to be calculated for each file.
Starting and stopping a report
There's also an option to exclude empty files. This is very useful when checking for files with same contents. (The same result can be achieved by setting the file size filter to 'greater than zero').
The control panel is the place where you start and stop these queries. The green button is used to start a query. You can only start one query at the time, so the green button is disabled whenever a query is running. You can interrupt a query by pressing the red 'Stop' button. Once a query is completely finished (eg. a folder is completely scanned), this 'Stop' button is automatically disabled and the 'Start' button is enabled again.