X-Fonter 14.0
Printing Fonts
X-Fonter can print two types of output for any font in your library — a Font Listing showing the font rendered at your chosen sample text and size, and a Character Map showing its full ASCII or Unicode character coverage. Both printout types work with installed fonts, fonts browsed from any folder, and fonts from your collections — no installation required before printing.
Starting a Print Job
- Navigate to the tab containing the fonts you want to print: the Installed tab, the Browse tab, or the Collections tab.
- Optionally, select the specific fonts you want — or leave the selection empty to print all fonts currently visible in the list.
- Press Ctrl+P, choose Print Font Overview from the File menu, or click the Print icon in the toolbar.
- The print dialog opens. Configure your options (described below) and click Print.
Section 1 — General
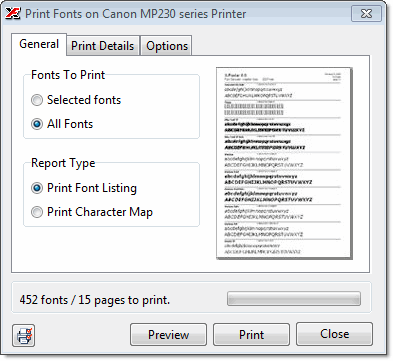
The General section has two choices:
- Font scope — print only the fonts currently selected in the font list, or print all fonts displayed in the list (after any active filtering). This lets you print a targeted subset without having to manually select every font.
- Report type — choose between Font Listing and Character Map. This selection changes the options available in the Print Details section below.
Section 2 — Print Details: Font Listing
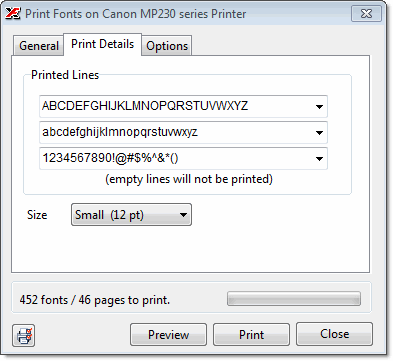
When Font Listing is selected, the Print Details section shows three sample text lines. Each line prints below the font name on the output sheet, rendered in that font at the selected size. Empty lines are omitted — they do not create blank space on the printout.
For each line you can either type your own text or choose from the predefined options in the dropdown:
abcdefghijklmnopqrstuvwxyzABCDEFGHIJKLMNOPQRSTUVWXYZ1234567890!@#$%^&*()
Custom text you enter is saved and pre-filled the next time you open the print dialog, so you do not have to re-enter it for repeat print jobs.
The size setting controls how large the sample text is rendered on the page. Larger sizes produce fewer fonts per page; smaller sizes fit more fonts per page. Watch the page count indicator in the General section as you adjust the size to find the right balance for your needs.
Section 2 — Print Details: Character Map

When Character Map is selected, the Print Details section lets you choose between an ASCII map and a Unicode map.
For ASCII maps you can select which part of the 256-character range to print. For Unicode maps you can select any of the available Unicode blocks from a list — Basic Latin, Latin Extended, Greek, Cyrillic, and so on — or enter a custom character range using start and end code point values. This makes it possible to print only the specific script or symbol block you are interested in, rather than the entire Unicode space.
Section 3 — Options
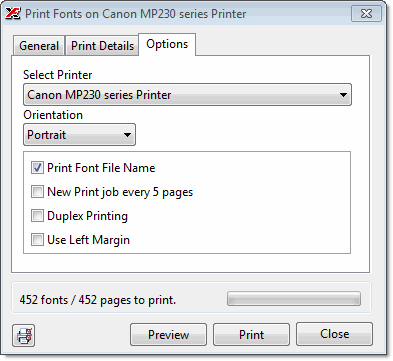
| Option | What it does |
|---|---|
| Select Printer | Choose which installed printer to send the job to. Any printer visible in Windows — including PDF printers and network printers — will appear in this list. |
| Orientation | Switch between Portrait and Landscape. Landscape fits more columns of characters per line in character map printouts, and can make font listing sheets more compact when sample text is long. |
| Print Font File Name | When enabled, the font's filename on disk is printed alongside or below the font name on each font listing entry. Useful when you need to cross- reference a printout with actual files — for example when cataloguing a font archive. |
| New Print Job Every 5 Pages | Splits a long print job into separate jobs of up to 5 pages each. Large print jobs can exceed the memory capacity of some printers, causing an out-of-memory error and an incomplete printout. Enabling this option reduces peak memory demand and makes large jobs more reliable. Enable it if you experience printer errors on long runs. |
Related Topics
- Print Preview — check how the output will look on the page before sending to the printer
- Font Overview Printout — detailed guide to the Font Listing report layout and output
- Character Map Printout — detailed guide to the Character Map report layout and output
- Font Filtering — narrow the font list before printing to produce targeted output without manual selection
Copyright © 2001-2026 Blacksun Software. All Rights Reserved