X-Fonter 14.0
Managing Collections
This page covers the day-to-day management of collections: adding fonts to them, removing fonts from them, and keeping links healthy as your font library evolves. For an overview of what collections are and how to create, rename, delete, load and unload them, see the Collections tab page.
Adding Fonts to a Collection
You can add fonts to a collection from any tab — Browse, Installed, or Collections. The collection must already exist before you can add fonts to it; to create a new one first, see the Collections tab page.
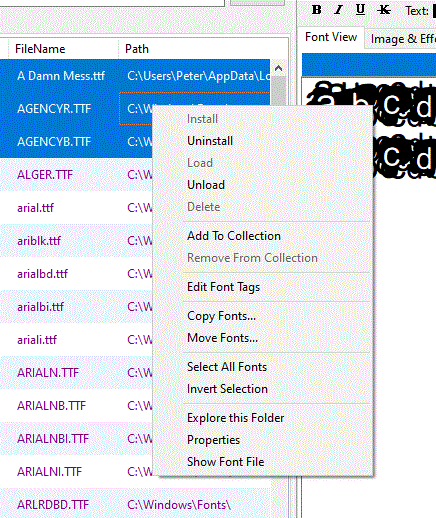
- Select one or more fonts in the font list. Use Shift+Click for a contiguous range or Ctrl+Click to build a non-contiguous selection.
- Right-click the selection to open the context menu.
- Hover over Add to Collection — a submenu lists every collection you have created.
- Click the target collection. The selected fonts are added immediately and the collection font count updates.
Removing Fonts from a Collection
Removing a font from a collection deletes only the reference stored inside the collection — the font file on disk is not touched. The font remains available via the Browse and Installed tabs, and continues to appear in any other collections it belongs to.
- Open the Collections tab and select the collection you want to edit.
- In the lower panel, select the font(s) you want to remove. Multi-select works here too.
- Right-click and choose Remove from Collection, or use the Remove button at the bottom of the screen.
Keeping Collection Links Healthy
A collection stores the full file path to each font at the time you add it —
for example D:\Fonts\Display\Bodoni72.ttf. If that path ever changes,
the link breaks and X-Fonter will flag the entry as an invalid font when the
collection is selected.
Links break when you:
- Rename a font file using Windows Explorer or another application
- Move a font file outside of X-Fonter
- Rename or relocate a parent folder that forms part of the stored path
- Disconnect a network drive or remove a USB drive that contained the font
To avoid broken links, always use X-Fonter's Copy & Move tools when relocating font files. X-Fonter updates all collection references automatically when it performs the move, so no links break.
Fixing Broken Links
If a font file has already been moved or renamed outside of X-Fonter, its collection entry will show an invalid font warning. To fix individual broken entries:
- Note the font name shown in the invalid entry.
- Select the broken entry and use Remove from Collection to clear it.
- Locate the font at its new path using the Browse tab.
- Add it back to the collection from its new location.
If many links are broken at once — for example after restructuring a whole folder tree outside of X-Fonter — it is usually faster to rebuild the affected collections from scratch. Use the Browse tab with Include Subfolders to re-scan the reorganised folder, select all results with Ctrl+A, and add them back to the collection in a single step.
Related Topics
- Collections tab — creating, renaming, deleting, loading and unloading collections
- Copy & Move Fonts — the safe way to relocate font files without breaking collection links
- Organizing Fonts — broader strategies for using collections, tags and folders together
- Font Tagging — an alternative categorisation method that is not path-dependent
- Browse & Find Fonts — scanning folders to find and add fonts to collections in bulk
Copyright © 2001-2026 Blacksun Software. All Rights Reserved